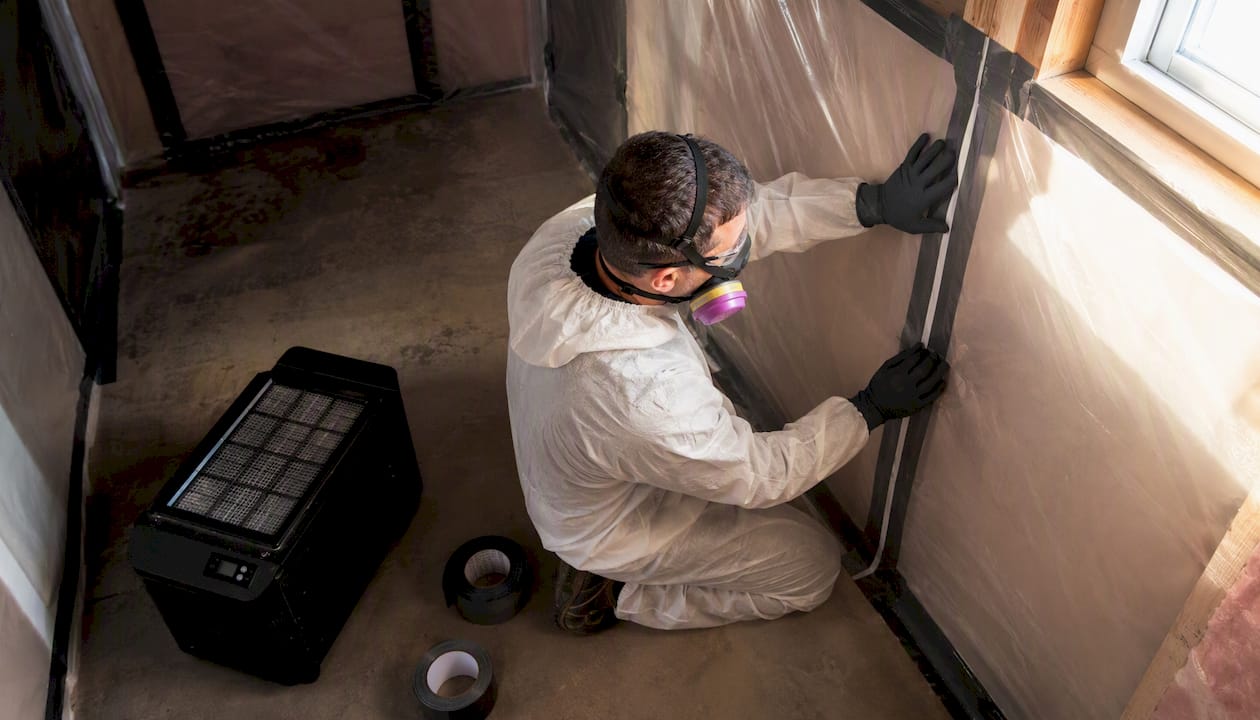
Negative air containment is a closed-enclosure system that uses HEPA-filtered exhaust to draw air out of a work zone faster than it enters, creating a sustained pressure differential that prevents hazardous fibres, spores, or dust from migrating to occupied areas. Under EACC Mould Abatement Guidelines and Ontario’s asbestos regulation guide, the minimum target is 5 Pascals (0.02 inches water column) of negative pressure with at least 4 air changes per hour (ACH) using HEPA-filtered exhaust. Containment cannot be dismantled until clearance air sampling confirms the enclosure meets regulatory limits. If you are working on older properties with hidden hazards, understanding these requirements before you break a single wall is not optional.
5 Pa / 0.02 in. WC and ≥4 ACH are the numeric floor for compliant negative air containment in Canada. Continuous measurement and recording are required, not recommended.
Key takeaways
Compliant negative air containment requires a minimum of 5 Pa (0.02 in. WC) pressure differential, at least 4 ACH of HEPA-filtered exhaust, continuous monitoring, and clearance air sampling before any containment is dismantled.
| Point | Details |
|---|---|
| Numeric setpoints | Maintain ≥5 Pa (0.02 in. WC) and ≥4 ACH throughout all abatement work. |
| Barrier and anteroom first | Build and smoke-test the full enclosure before starting any negative air machine. |
| Clearance testing is mandatory | Collect and pass clearance air samples before dismantling; federal and Ontario regulations both require it. |
| Document everything | Log pressure readings, filter changes, personnel, and clearance results for every project. |
| Hmjcontracting for licensed work | For Type 2/3 asbestos, mould remediation, or occupied-building abatement in Ottawa, Hmjcontracting provides full containment, monitoring, and clearance coordination. |
Table of Contents
- How do you build the physical containment and anteroom?
- How do you seal HVAC returns and unwanted air pathways?
- How do you choose and position negative air machines?
- Should you vent exhaust outdoors or keep it on-site?
- How do you measure, log, and maintain pressure and air changes?
- What does clearance air testing require before you dismantle containment?
- What PPE and decontamination do workers need?
- How should you inspect, maintain, and document a containment project?
- What goes wrong with negative air containment, and how do you fix it?
- When does hiring a licensed abatement contractor make sense?
- What the field actually teaches you about containment
- Sources
How do you build the physical containment and anteroom?
Erecting the enclosure correctly is the single most important step. A well-sealed barrier that holds pressure makes every downstream measurement and clearance test meaningful. A leaky one makes them worthless.
Construction sequence:
- Identify the full perimeter of the work zone, including ceiling, floor, and all penetrations (pipes, conduit, doorways).
- Frame temporary walls where permanent barriers do not exist, using 2×4 lumber or metal stud at 600 mm centres.
- Install a minimum two-layer polyethylene sheeting (6-mil minimum) over framed walls, lapping seams by at least 300 mm and sealing all edges with pressure-sensitive abatement tape.
- Protect the floor with a minimum 6-mil poly drop sheet, taped at the perimeter.
- Construct a single-chamber anteroom (change room) at the sole entry point using a second poly wall and a zippered doorway on each side. The anteroom is where workers don and doff PPE and where decontamination begins.
- Post regulated signage at the anteroom entry: hazard identification, authorised-personnel-only notice, and emergency contact information.
Material checklist:
- 6-mil polyethylene sheeting (walls, floor, ceiling)
- Abatement-grade pressure-sensitive tape (foil-backed or poly)
- Zippered access panels (pre-fabricated or site-built)
- 2×4 or metal stud framing
- Regulatory signage
- Smoke pen or theatrical smoke for verification
Access control is non-negotiable. Only personnel with the correct PPE and training enter the containment. A log at the anteroom entry records every person in and out.
Pro Tip: Before you start any negative air machine, walk the full perimeter with a smoke pen. Hold it near every seam, tape joint, and floor edge. Any smoke drawn toward the wall confirms a leak path that will prevent you from reaching and holding 5 Pa. Fix it now, not after the machines are running.
How do you seal HVAC returns and unwanted air pathways?
Every uncontrolled opening is a pressure leak. HVAC return grilles, transfer ducts, exhaust fans, and even electrical outlets inside the containment zone can bleed pressure and create pathways for contaminated air to reach occupied spaces.
Start by walking the zone with the building’s mechanical drawings in hand. Identify every return grille, supply diffuser, and transfer duct within or adjacent to the containment. Supply diffusers inside the zone must be sealed with poly and tape; return grilles must be sealed from the containment side so that the building’s air-handling unit does not pull contaminated air into the ductwork.
Pro Tip: Never seal a life-safety exhaust vent, a pressurisation fan serving a stairwell, or any duct that is part of the building’s fire or smoke-control system. Consult the building’s mechanical engineer or HVAC technician before sealing anything you cannot positively identify.
Techniques for sealing include rigid plywood covers with foam gaskets for large grilles, magnetic vent covers for smaller diffusers, and temporary flexible duct to reroute supply air around the containment. Gaps around pipes and conduit penetrating the containment walls are best sealed with spray foam or backer rod and acoustical sealant, then taped over with abatement tape.
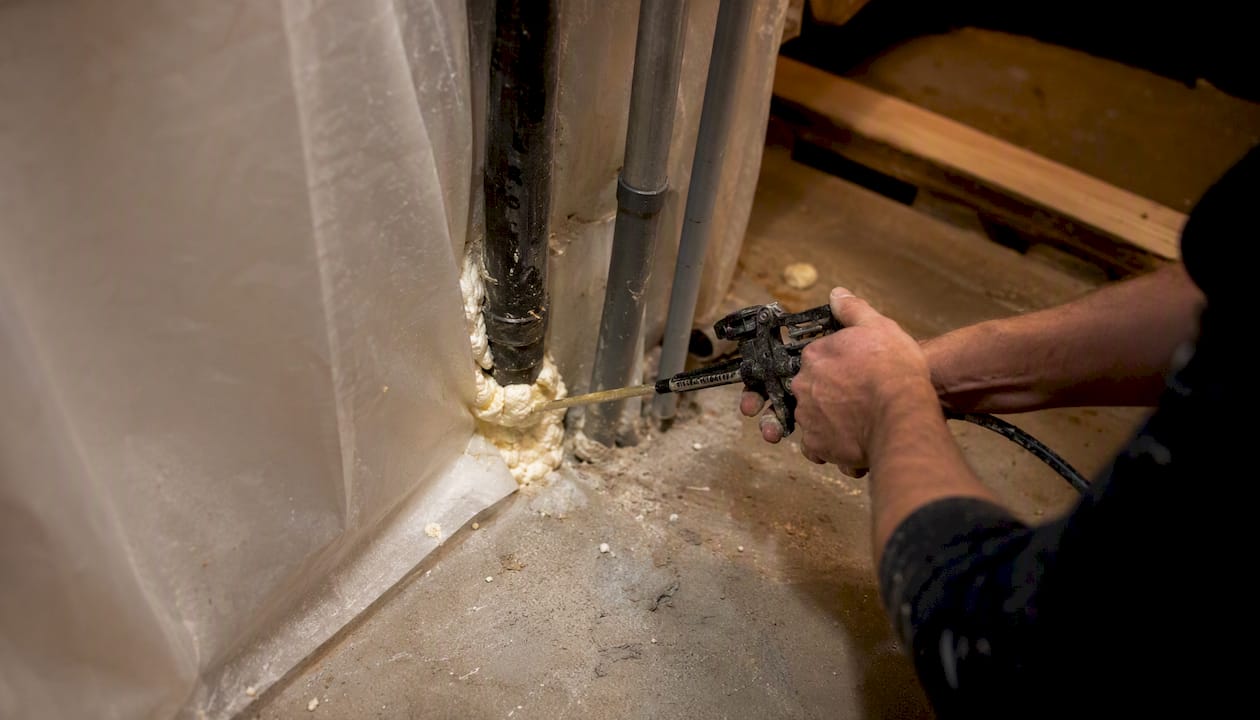
When the containment is in a multi-tenant building or an occupied commercial space, coordinate with building services before work begins. Sealing returns in one zone can shift pressure relationships in adjacent zones, potentially affecting neighbouring occupants. A brief HVAC commissioning check after sealing confirms the rest of the building’s ventilation is unaffected.
How do you choose and position negative air machines?
Sizing and placement determine whether your enclosure reaches and holds the 5 Pa setpoint. An undersized unit running at capacity will struggle to maintain pressure in a leaky enclosure; an oversized unit placed incorrectly can create dead zones where contamination accumulates.
Capacity calculation:
To hit the required air changes per hour, calculate the enclosure volume (length × width × height in cubic feet), multiply by the minimum typical air changes, and divide by 60 to get the minimum required CFM. Most commercial negative air machines deliver several hundred to a few thousand CFM, so a single unit typically covers a standard room with margin. That margin matters: EACC guidance notes that drafty or complex layouts often require exceeding the minimum setpoint to maintain reliable isolation.
Placement checklist:
- Position the exhaust port so it discharges outside the containment (through a window, wall penetration, or temporary duct to the exterior).
- Place the machine intake at the far end of the containment from the anteroom entry, so air flows across the work zone before being exhausted.
- Workers should be positioned between the intake and the work area, not between the work area and the exhaust, to avoid pulling contaminated air past them.
- Keep the machine off the floor on a stable platform to reduce vibration and prevent poly sheeting from being drawn into the intake.
- When running multiple units, stagger their positions to avoid short-circuiting airflow between adjacent intakes and exhausts.
Filter management:
- Inspect the pre-filter and HEPA filter before each use; replace if damaged or loaded.
- Perform DOP/PAO integrity testing on the HEPA unit before deployment and after any servicing.
- Clean the exterior cabinet before removing the machine from the containment to prevent cross-contamination.
- Log filter changes with date, technician name, and filter serial number.
Should you vent exhaust outdoors or keep it on-site?
Outdoor discharge is the preferred option. Exhausting filtered air to the exterior eliminates any risk of recirculation and simplifies pressure management. The decision to discharge indoors instead should be driven by a documented site-specific risk assessment, not convenience.
Decision factors for outdoor vs. on-site discharge:
- Proximity to people: If the exhaust point is near a building air intake, a pedestrian area, or an operable window on an adjacent floor, outdoor discharge requires a discharge stack or extension duct to direct exhaust away from those locations.
- Building geometry: High-rise or below-grade work may make exterior discharge impractical. In those cases, on-site recirculation through a HEPA unit is acceptable only after DOP/PAO leak testing confirms the unit has no bypass leakage.
- Regulatory constraints: Some municipal bylaws restrict discharge locations or require dust screens on exterior exhaust points during demolition.
On-site leak testing checklist (when outdoor discharge is not feasible):
- Confirm the HEPA unit has a current DOP/PAO test certificate.
- Perform a site-specific leak test at the discharge point using an aerosol photometer.
- Document test results, date, technician, and instrument calibration status.
- Re-test after any filter change or unit relocation.
For outdoor demolition or work where full enclosure is not possible, a local exhaust ventilation shroud or capture hood at the point of disturbance, combined with wetting, is the accepted alternative. The goal remains the same: prevent contaminated air from reaching uncontrolled areas.
How do you measure, log, and maintain pressure and air changes?
Measurement is what separates a compliant containment from a guess. Pressure readings and ACH calculations must be recorded continuously or at defined intervals, and those records are what regulators and building owners will ask for.
Instruments and measurement points:
- Use a magnehelic gauge or a calibrated digital manometer to measure the pressure differential between the containment interior and the adjacent clean area.
- Place the sensing port near the anteroom entry, where the pressure differential is lowest and most representative of the weakest point in the enclosure.
- Calibrate instruments before each project and document the calibration date.
- For continuous monitoring, a data-logging manometer that records readings at set intervals (every 15 minutes is common) provides the most defensible record.
ACH calculation:
Divide total machine CFM output by the enclosure volume in cubic feet, then multiply by 60. For a 1,080 cubic-foot room with a 500 CFM machine: (500 ÷ 1,080) × 60 = 27.8 ACH, well above the 4 ACH minimum. Document the calculation in the project file.
Monitoring log (minimum items):
| Log Item | Frequency | Acceptable Range |
|---|---|---|
| Pressure differential | Every 4 hours (minimum) | ≥5 Pa / 0.02 in. WC |
| ACH verification | Daily | ≥4 ACH |
| Filter condition check | Daily | No visible damage or loading |
| Personnel on site | Each entry/exit | All authorised personnel logged |
A reading below 5 Pa is a failed reading. Stop work, identify the leak or equipment fault, correct it, and confirm the setpoint is restored before resuming. Document the failure, the corrective action, and the time of restoration in the log.
What does clearance air testing require before you dismantle containment?
Clearance air testing is the regulatory go/no-go milestone. Under federal asbestos regulations SOR/86-304, an enclosure used for high-risk activities cannot be dismantled until clearance sampling confirms the enclosure meets the applicable regulatory limits. Ontario’s asbestos regulation guide reinforces this point: clearance testing is mandatory before dismantling for Type 3 operations.
Sampling sequence:
- Complete the final clean of all surfaces inside the containment (HEPA vacuum, wet wipe).
- Use forced air (an air scrubber running in recirculation mode or a leaf blower directed at surfaces) to agitate settled dust and resuspend any remaining fibres. This step ensures the clearance sample reflects the worst-case airborne concentration, not a settled-dust baseline.
- Collect air samples using a certified sampler and validated sampling method (phase contrast microscopy or transmission electron microscopy, depending on the hazard and regulatory requirement).
- Submit samples to an accredited laboratory with a completed chain-of-custody form.
- Await laboratory results before touching the containment structure.
Who performs sampling:
Sampling must be performed by a competent person with recognised training in air sampling methodology. For asbestos, this typically means a certified asbestos abatement supervisor or an independent hygienist. For mould, a qualified indoor air quality professional is appropriate.
Documentation to retain:
- Laboratory sample reports (with accreditation number)
- Chain-of-custody forms
- Sampling location plan (photos or sketch)
- Clearance certificate or written confirmation of pass/fail result
- Photographs of the containment interior before and after final clean
Once clearance is confirmed, occupancy decisions and post-abatement documentation can proceed. Do not dismantle until the written result is in hand.
What PPE and decontamination do workers need?
Personal protective equipment and decontamination procedures are not optional add-ons. They are required controls under provincial occupational health and safety legislation, and they protect workers from the same hazards the containment is designed to isolate.
PPE for Type 2/3 asbestos and mould work:
- Half-face or full-face respirator with P100 (HEPA) cartridges, or a powered air-purifying respirator (PAPR) for higher-exposure tasks
- Disposable Tyvek coveralls (Type 5/6 minimum) with hood and booties
- Nitrile gloves, double-gloved for asbestos work
- Safety glasses or goggles under the respirator facepiece
- Rubber boots (decontaminated at the dirty-side exit)
Decontamination flow:
Workers move from the dirty side of the containment into the anteroom, remove outer coveralls and booties, bag and seal them as contaminated waste, then shower (where a shower unit is required) before entering the clean side. The anteroom is the critical transition point; nothing from the dirty side crosses to the clean side without being decontaminated or bagged.
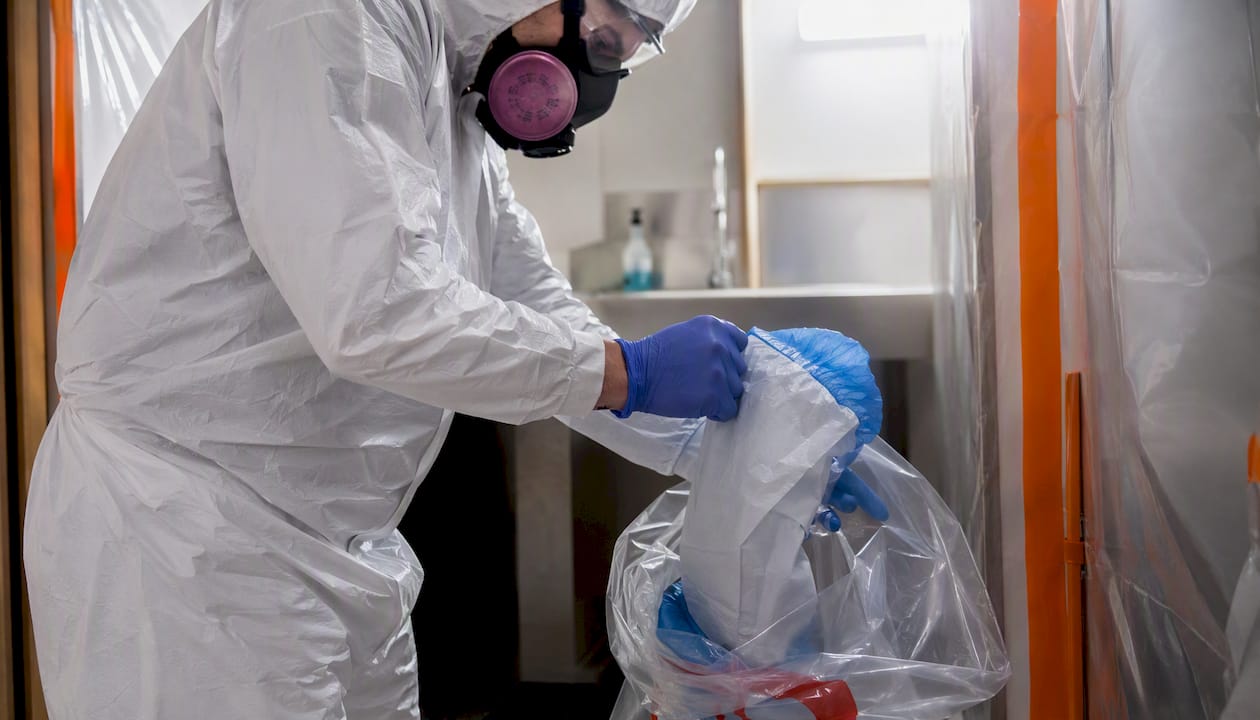
A glove-bag procedure is acceptable for small, isolated asbestos tasks (such as pipe insulation removal at a single fitting) where a full enclosure is not required under O. Reg. 278/05. For Type 3 operations, a full decontamination unit with a shower is required.
Workers must be trained to the level required by their provincial regulation. In Ontario, that means completing an approved asbestos abatement worker or supervisor course before performing Type 2 or Type 3 work. Negative pressure must be maintained until all contaminated work is complete, not just until the visible debris is removed.
How should you inspect, maintain, and document a containment project?
Good documentation is what protects you when a project is audited, when a building changes hands, or when a future renovation uncovers the same area. Ontario guidance highlights that clearance reports and asbestos work records are essential for future building management and legal due diligence.
Pre-job equipment checks:
- HEPA filter integrity (visual inspection and DOP/PAO test certificate current)
- Motor seals and cabinet integrity (no visible cracks or gaps)
- Ducting connections (no loose fittings or tape failures)
- Pressure gauge calibration date
Daily log items:
- Date, site address, project number
- Personnel on site (names and certifications)
- Pressure readings (time-stamped, minimum every 4 hours)
- Filter condition and any changes made
- Any deviations from the work plan and corrective actions taken
Post-job documentation package:
- Clearance air sampling reports and chain-of-custody forms
- Waste manifests (for asbestos or hazardous waste disposal)
- Photographic evidence (pre-job, during, and post-clean)
- Equipment maintenance and filter-change log
- Signed completion report
These records support occupancy decisions after abatement and give future contractors a clear picture of what was done and where. Property owners who skip documentation often discover the gap when they try to sell or refinance.
What goes wrong with negative air containment, and how do you fix it?
Even well-planned containments develop problems. Knowing the symptoms and their causes lets you correct them before a failed clearance sample or a regulatory stop-work order.
| Symptom | Likely Cause | Corrective Action |
|---|---|---|
| Pressure below 5 Pa | Barrier leak or undersized unit | Smoke-pen survey to find leak; add capacity or seal breach |
| Pressure fluctuating | HVAC cycling or door use | Seal HVAC interactions; add a self-closing anteroom door |
| Visible dust at anteroom | Positive pressure event or torn poly | Stop work; inspect and repair barrier; re-verify pressure |
| Odour outside containment | Inadequate ACH or exhaust recirculation | Increase machine CFM; redirect exhaust away from intake |
| Failed clearance sample | Insufficient cleaning or premature sampling | Re-clean, re-agitate, re-sample; do not dismantle |
Quick checks before stopping work:
- Confirm the machine is running (power, motor noise, airflow at exhaust).
- Check the pre-filter; a clogged pre-filter can reduce airflow by more than half.
- Inspect all tape seams at floor and ceiling junctions.
- Verify the anteroom zipper is fully closed.
When pressure cannot be restored after these checks, or when a clearance sample fails twice, halt operations and call a certified abatement contractor. Continuing work in a compromised containment exposes workers and building occupants to the hazard the system was designed to control.
When does hiring a licensed abatement contractor make sense?
Negative air containment is a critical safety control under occupational health and safety frameworks across Canada. It is not a DIY task, and the EACC guidelines are direct on this point. There are specific situations where hiring a licensed contractor is not just advisable but legally required.

You need a licensed contractor when the work involves Type 2 or Type 3 asbestos as defined under O. Reg. 278/05, when mould remediation exceeds the threshold for minor work, when the building is occupied during abatement, or when clearance air sampling is required before re-occupancy. Property owners who attempt to manage these projects without licensed personnel risk regulatory penalties, failed clearance tests, and liability for any health impacts on occupants.
Hmjcontracting provides licensed asbestos abatement, mould remediation, and demolition services for Ottawa-area residential and commercial properties, with full negative air containment setup, pressure monitoring, and clearance testing coordination included in every abatement project. Every project comes with a detailed, itemised quote, a written work plan, and a complete post-job documentation package. There are no surprises on scope or cost.
To get started, contact Hmjcontracting for a free on-site estimate. The team will assess the hazard, confirm the regulatory classification, and provide a clear plan before any work begins.
What the field actually teaches you about containment
The technical requirements for negative air containment are well-documented. What the regulations cannot fully capture is how quickly a containment can fail when the fundamentals are rushed.
On a typical Ottawa abatement project, the first hour is the most important. Barrier integrity, anteroom construction, and HEPA unit placement all need to be right before the machines start. We have seen projects where the pressure gauge read 5 Pa at startup, then dropped to 2 Pa an hour later because a single tape seam at a floor junction had lifted in a cold basement. A smoke pen would have caught it in two minutes. The fix took five. Without the check, the team would have worked in a compromised enclosure for hours before noticing.
Hmjcontracting’s team holds the certifications required under Ontario regulations, and every project includes a pre-work equipment validation and a documented smoke-pen survey. When a clearance sample fails, which happens occasionally even on well-run sites, the response is a structured re-clean and re-sample, not a debate about whether the result is valid. The documentation from every project, including failed samples and corrective actions, goes into the client’s file. That record has real value when a property is sold or when a future contractor needs to understand what was done.
Sources
These primary sources set the numeric requirements and regulatory framework referenced throughout this guide. Consult the current version of each for your jurisdiction-specific obligations.
- EACC Mould Abatement Guidelines Edition 3 (2015)
- A guide to the Regulation respecting Asbestos on Construction Projects and in Buildings and Repair Operations (Ontario)
- Regulations SOR/86-304 — definitions and clearance air sampling (Canada)
Regulations are updated periodically. Verify the current version with the issuing body before relying on any specific requirement for a project.
This article is general information, not a substitute for advice from a qualified lawyer. Consult a qualified legal professional about your own circumstances before acting on anything here.