Your abatement report tells you one of three things: the material is safe to leave alone, it needs monitoring, or it requires abatement before any work proceeds. Knowing which category applies to your property starts with scanning five fields in the report right now.
Check these immediately:
- Lab result (positive/negative): A positive result means asbestos was detected. Negative clears only that specific sample location, not the whole building.
- Percent asbestos: Certain concentrations may trigger regulatory requirements in some Canadian provinces. Higher percentages do not automatically mean greater danger, and the exact concentration thresholds triggering regulatory requirements vary by jurisdiction.
- Friable vs. non-friable: Friable material crumbles by hand pressure and releases fibres easily. Non-friable material is bound in a matrix and is generally lower risk when undisturbed.
- Condition (intact or damaged): Damaged or deteriorating material, regardless of friability class, usually requires prompt action.
- Prescribed recommendation: If the report already recommends abatement, that recommendation carries regulatory weight. Do not begin renovation until it is addressed.
If your report shows damaged friable asbestos-containing material (ACM), stop all work in that area immediately. Isolate the space, restrict access, and notify your contractor and the relevant provincial regulator. WorkSafeBC and Health Canada both confirm that asbestos exposure remains a serious occupational and household hazard. For Ottawa homeowners, Hmjcontracting provides licensed abatement and can help you act on findings quickly.
Pro Tip: Before reading any other section, locate the report's scope statement. Many surveys cover only the areas planned for renovation, not the whole building. A clean result in one zone does not mean the rest of the property is clear.
Key takeaways
Abatement report results require you to check five fields first: lab result, percent asbestos, friability, material condition, and the prescribed recommendation, then act on the highest-risk finding before any renovation proceeds.
| Point | Details |
|---|---|
| Check five fields first | Lab result, percent asbestos, friability, condition, and recommended action determine your next step. |
| Condition matters as much as percentage | Damaged friable ACM at 1.5% can require faster action than intact non-friable ACM at 5%. |
| Clearance must be independent | A third-party inspector or industrial hygienist must perform clearance; contractor self-clearance is not acceptable. |
| Retain all documentation | Keep the original report, lab certificates, chain-of-custody, notification number, disposal manifests, and clearance letter. |
| Hmjcontracting for Ottawa projects | Licensed abatement, third-party clearance coordination, and full documentation packages are available with a free estimate. |
Table of Contents
- What a complete abatement survey report contains
- How to read bulk sample and laboratory result fields
- Why clearance testing must be done by an independent party
- What to do after a concerning result: your action checklist
- Timeline and cost: what drives both
- Common abatement terms decoded
- Who to call in Canada and what documentation to keep
- What experienced abatement contractors actually look for
- Hmjcontracting handles the full abatement process for Ottawa homeowners
- Sources
What a complete abatement survey report contains
A well-prepared abatement or Designated Substance Survey (DSS) report follows a standard structure. According to WorkSafe Saskatchewan's safe work procedure guide, a complete survey report should include all of the following sections:
- Cover letter / executive summary: States the purpose, scope, and key findings in plain language. This is where the overall verdict appears.
- Scope of work: Defines which areas, materials, and building systems were assessed. Anything outside this scope was not tested.
- Site and building description: Building age, construction type, and renovation history that inform where ACM is likely to be found.
- Sampling methodology and location map: Describes how samples were collected (bulk sampling, visual assessment) and provides a floor plan showing each sample point.
- Laboratory results table: The core data section. Every sample appears here with its result, percentage, and condition rating.
- Photographs: Images tied to specific sample IDs showing the material in place, its condition, and its location.
- Chain-of-custody forms: Documents the handling of each sample from collection through lab analysis. This is a legal record.
- Recommendations and controls: Prescribes the action for each positive result: monitor, encapsulate, enclose, or remove.
- Asbestos inventory: A living document listing all known or suspected ACM in the building. Per the RenoHouse DSS guide, this inventory drives contractor scope and permit documentation and must be updated after any abatement or new discovery.
For compliance and future property disclosure, three elements are non-negotiable: the signed lab certificate, the chain-of-custody forms, and the inspector's credentials and licence number.
The lab results table you should expect looks like this:
| Sample ID | Location | Material description | Asbestos type | % Asbestos | Condition / friability | Recommended action |
|---|---|---|---|---|---|---|
| — | Basement ceiling | Spray-applied texture | Chrysotile | 3% | Friable / damaged | Removal |
| — | Main floor vinyl tile | Floor tile and mastic | Chrysotile | 2% | Non-friable / intact | Monitor |
Pro Tip: Check the report's issue date and scope statement together. A survey scoped to a kitchen renovation does not cover the basement. If your project has expanded since the survey was done, request a supplemental assessment before proceeding.
How to read bulk sample and laboratory result fields
Each row in the lab results table represents one physical sample. Here is how to interpret the fields:
| Field | What it means | What to look for |
|---|---|---|
| Sample ID | Unique identifier tied to the location map and photo log | Cross-reference with the site map to confirm location |
| Material type | The building product sampled (e.g., floor tile, pipe insulation, drywall compound) | Matches the material you plan to disturb |
| Lab method | PLM (polarised light microscopy) is standard; TEM (transmission electron microscopy) is more sensitive | TEM is used for confirmation or air sampling |
| Asbestos type | Chrysotile (most common), amosite, crocidolite, tremolite, actinolite, anthophyllite | All types are regulated; crocidolite and amosite carry higher health risk |
| % Asbestos | Concentration detected in the sample | Above 1% triggers regulatory requirements in most Canadian provinces |
| Condition / friability | Intact, damaged, friable, or non-friable | Damaged friable material requires the most urgent response |
| Recommended action | Monitor, encapsulate, enclose, or remove | Follow this recommendation before any disturbance |
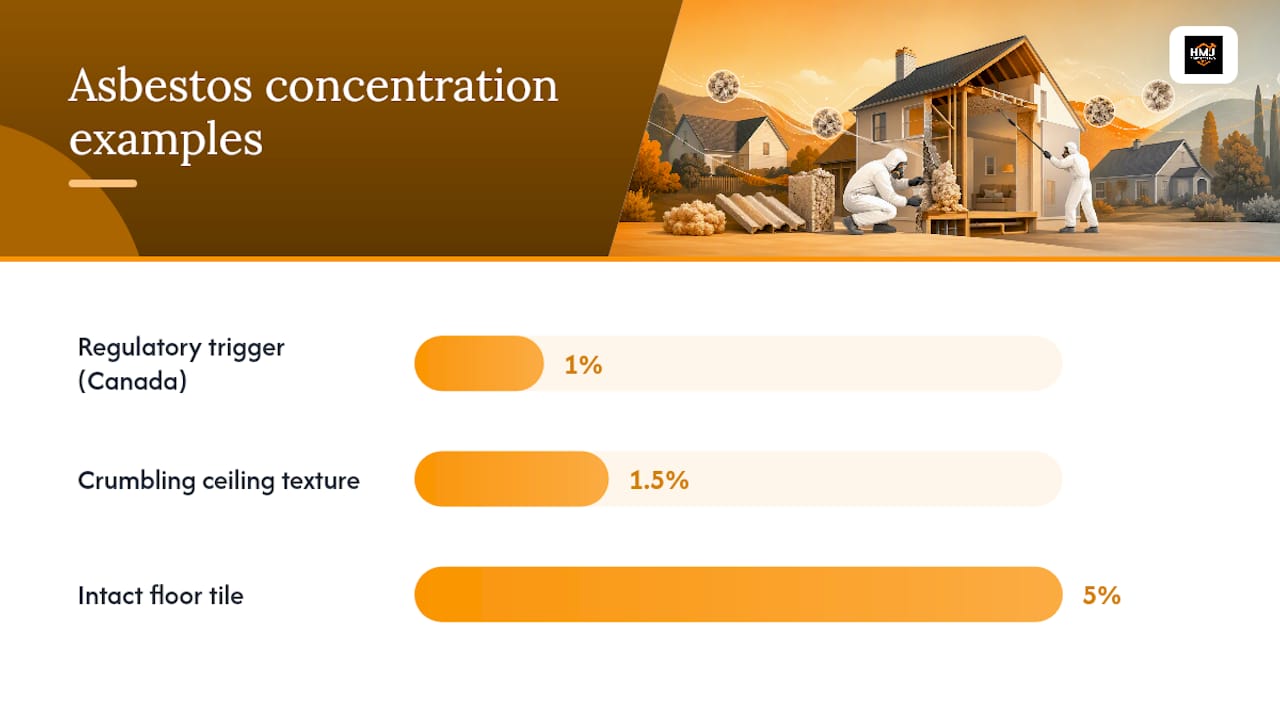
According to InspectandTest's asbestos inspection report guide, intact non-friable materials can often be managed in place rather than removed. The percentage figure alone does not determine the action. A 5% chrysotile floor tile that is intact and undisturbed may be safely monitored, while a 1.5% spray-applied ceiling texture that is crumbling requires prompt removal.
A few important limits to understand:
- A negative result clears only the sampled material at that specific location. Adjacent materials of the same type may still contain asbestos.
- PLM analysis has a detection limit; a result reported as "trace" or "less than 1%" may still warrant caution depending on the material type and planned disturbance.
- The lab certificate must carry the analyst's signature and the laboratory's accreditation number. An unsigned or unaccredited report is not compliant.
Why clearance testing must be done by an independent party
Clearance testing confirms that an abatement area is safe for re-occupancy. It happens after removal or encapsulation is complete and before any containment barriers come down.
The process has two stages:
- Visual inspection: A qualified inspector walks the contained area and confirms no visible debris, dust, or residue remains. This is a pass/fail check before air sampling begins.
- Aggressive air sampling: Air movers disturb settled dust, then air samples are collected and sent to an accredited lab for analysis. Results must fall below the applicable provincial action level before the area is cleared.
Industry best practice and regulatory guidance are clear: final clearance must be performed by an independent third-party inspector or industrial hygienist. Allowing the abatement contractor to conduct their own clearance creates a direct conflict of interest and produces results that may not hold up to regulatory scrutiny.
Before you allow re-entry, confirm you have received all of the following in writing:
- Name, credentials, and licence number of the third-party clearance inspector
- Written confirmation of a passed visual inspection
- Air-sampling results with lab analysis attached
- The accredited lab certificate for the air samples
- A signed clearance letter addressed to the property owner
Pro Tip: Ask the clearance inspector to reference the original project notification number or survey report number in the clearance letter. This creates a traceable paper trail that connects the abatement work to its verified outcome, which matters at resale and during future renovations.
What to do after a concerning result: your action checklist
Seeing a positive result or a removal recommendation in a report can feel alarming. A clear sequence of steps keeps you protected and compliant.
- Stop all work in the affected area. Do not disturb the material further. If work is already underway and a previously unrecorded material is discovered, stop immediately and notify the property owner, contractor, and the relevant provincial labour ministry.
- Isolate and restrict access. Close off the area and post clear signage. Keep occupants and workers out until a qualified consultant advises otherwise.
- Contact the consultant who issued the report. They can clarify the finding, confirm the urgency level, and advise on the written scope of work needed.
- Obtain a written scope of work. This document defines the abatement method, containment class, disposal plan, and clearance requirements. Do not proceed without it.
- Solicit at least two licensed abatement bids. Per contractor vetting guidance, each bid should include a site-specific abatement plan, proof of licence, pollution-liability insurance, and a named third-party clearance provider.
- Confirm the notification and permit requirements. Most provinces require advance notification to the relevant ministry before abatement begins. WorkSafeBC's ten-step compliance guide outlines these obligations clearly. Request the notification number once filed.
- Plan for independent clearance. Confirm who will perform clearance testing and that they are not affiliated with the abatement contractor.
Questions to ask every contractor before signing:
- What is your provincial abatement licence number?
- Does your insurance include pollution-liability coverage?
- Who will perform clearance testing, and what are their credentials?
- Which disposal facility will receive the waste, and will you provide a disposal manifest?
- How many air samples will be collected during clearance?
Documentation to request and retain:
- Written scope of work with containment class specified
- Chain-of-custody forms for all samples
- Lab certificates for bulk and air samples
- Provincial notification number
- Disposal manifest
- Signed clearance letter
Timeline and cost: what drives both
The abatement process follows a regulated sequence, and each phase adds time. Skipping steps, particularly notification or clearance, creates regulatory risk and can force rework.
Typical phases and approximate durations:
- Inspection and bulk sampling: 1–2 days on site, plus lab turnaround
- Lab analysis (PLM): typically 3–5 business days; rush service is available at higher cost
- TEM confirmation (if required): adds 5–10 business days
- Contractor bidding: allow 5–10 business days for site-specific proposals
- Provincial notification waiting period: varies by province, commonly 10–14 days before work begins
- Containment, removal, and disposal: 1 day for a single room to several weeks for a whole-home project
- Clearance testing and lab turnaround: 2–5 business days after abatement
Cost drivers to understand before comparing bids:
- Material type and quantity (pipe insulation costs more per linear metre than floor tile)
- Friability class (friable materials require higher containment and more protective equipment)
- Accessibility (attic spray insulation or crawlspace pipe wrap adds labour time)
- Disposal distance and landfill tipping fees for regulated waste
- Containment class required (Type 1 through Type 3 in most provincial frameworks)
- Whether TEM confirmation is needed in addition to PLM
- Third-party clearance fees (typically billed separately from abatement)
A single-room popcorn ceiling removal in Ottawa is a very different scope from a full-home gut renovation in a 1960s bungalow. Bids that appear significantly below others in the same scope often reflect missing steps, such as no third-party clearance or unlicensed disposal. Standard homeowner insurance policies in Canada generally exclude asbestos abatement costs, so budget planning should account for the full sequence.
Common abatement terms decoded
Understanding the language in your report makes every conversation with a contractor or regulator more productive.
- Abatement: Any activity that reduces or eliminates the risk posed by ACM. This includes removal, encapsulation, and enclosure.
- Friable: Material that can be crumbled, pulverised, or reduced to powder by hand pressure. Friable ACM releases fibres most readily and typically requires the most controlled removal method.
- Non-friable: Material in which asbestos fibres are bound in a solid matrix (vinyl tile, cement board). Non-friable ACM is lower risk when undisturbed but can become friable if cut, sanded, or drilled.
- Encapsulation: Applying a sealant or coating over ACM to prevent fibre release. Appropriate for intact, non-friable materials in good condition. The material remains in place and must be tracked in the asbestos inventory.
- Enclosure: Building a physical barrier around ACM (drywall, plywood) to prevent access and disturbance. Like encapsulation, the material stays in place and requires ongoing monitoring.
- Removal: Complete extraction and disposal of ACM at a licensed facility. The only option when material is damaged, friable, or located in an area that will be disturbed by renovation.
- Asbestos inventory: The living document listing all known or suspected ACM in a building, with location, condition, and recommended action. It must be updated after any abatement, new discovery, or damage. See hidden renovation hazards in older Canadian homes for common materials that appear in these inventories.
- Clearance testing: Post-abatement air and visual testing by an independent party confirming the area is safe for re-occupancy.
- Abatement potential: A risk rating in some reports indicating how likely a material is to release fibres if disturbed. High abatement potential means disturbance is likely to create an exposure risk.
- P5 (Procedure 5): In some provincial frameworks, a specific asbestos management procedure or plan designation. If your report references P5, ask the consultant to explain which provincial procedure applies and what it requires.
Who to call in Canada and what documentation to keep
Each role in the abatement process serves a distinct purpose. Knowing who does what prevents gaps in your documentation and protects you legally.
- Environmental consultant / designated substance surveyor: Conducts the initial survey, writes the report, and issues the asbestos inventory. This is the person whose credentials and licence number should appear on the cover page.
- Accredited laboratory: Analyses bulk and air samples using PLM or TEM. The lab must hold accreditation recognised in your province (AIHA-LAP, CALA, or provincial equivalent).
- Industrial hygienist (IH): Provides independent clearance testing and, in complex projects, may oversee the abatement plan. The IH performing clearance must have no financial relationship with the abatement contractor.
- Licensed abatement contractor: Carries out the physical removal, encapsulation, or enclosure work under the scope of work defined by the consultant. Verify their provincial licence before signing any contract.
- Provincial regulator / municipal building permit office: Receives notification before abatement begins and may inspect the site. In Ontario, this is the Ministry of Labour, Immigration, Training and Skills Development. Other provinces have equivalent bodies. Check why abatement before renovation is required for a summary of regulatory obligations.
Document retention checklist:
- Original inspection or DSS report with all appendices
- Lab certificates and chain-of-custody forms for all samples
- Signed scope of work with containment class and disposal plan
- Provincial notification number and any regulator correspondence
- Disposal manifests from the licensed waste facility
- Clearance letter signed by the independent inspector or IH
Pro Tip: Keep both a digital copy (cloud-stored) and a printed copy in the property file. At resale, Ontario's disclosure requirements and similar rules in other provinces mean buyers or their lawyers may ask for this documentation. Missing records can delay closing or reduce sale price.
What experienced abatement contractors actually look for
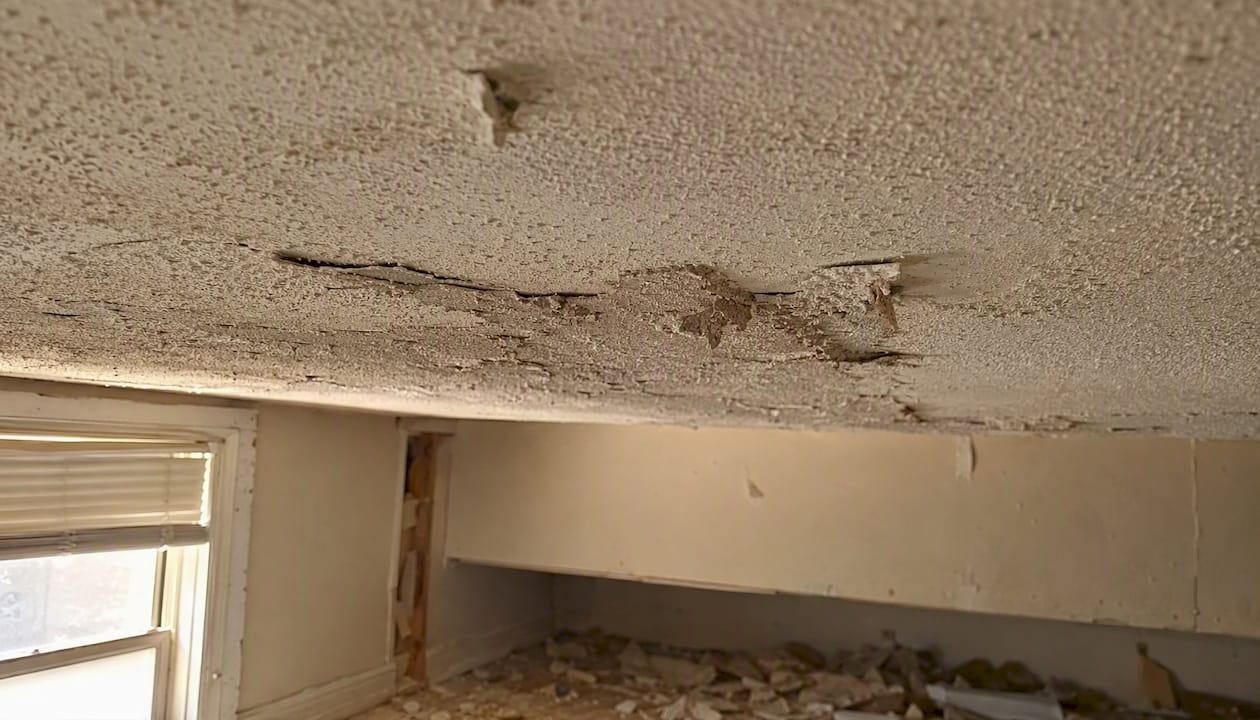
Most homeowners focus on the percentage figure in the lab results. Contractors who have worked through hundreds of projects know the condition rating and friability assessment carry equal weight. A 3% chrysotile result in a sealed, intact floor tile under new flooring is a very different situation from a 1.5% result in a spray-applied ceiling texture that is visibly crumbling. The percentage gets your attention; the condition and friability fields tell you what to do about it.
The red flags that should make you pause before signing with any contractor: a bid that arrives without a site-specific abatement plan, a refusal to name the clearance hygienist, or any suggestion that the abatement crew will also handle clearance testing. That last point is the most common shortcut in the industry. Clearance conducted by the same company that performed the removal is not independent, and results produced that way may not satisfy provincial regulators or stand up during a property transaction.
On the scheduling side, the provincial notification waiting period is the most frequently underestimated delay. Build at least two weeks into your renovation timeline after the abatement scope is confirmed, before the contractor can legally begin. Homeowners who plan renovation start dates without accounting for this period end up with compressed timelines and pressure to cut corners. A realistic renovation timeline that accounts for abatement sequencing protects both your budget and your project quality.
Verify every contractor's pollution-liability insurance separately from their general liability policy. General liability alone does not cover asbestos-related claims in most Canadian policies. Ask for the certificate of insurance and confirm the pollution-liability endorsement is active before work begins.
Hmjcontracting handles the full abatement process for Ottawa homeowners
Reading a report is the first step. Acting on it correctly, with the right documentation and licensed professionals, is what protects your property and your family.
Hmjcontracting provides licensed asbestos abatement for Ottawa homeowners and property managers, covering the complete sequence from containment and removal through disposal and third-party clearance coordination. Every project includes a detailed, itemised quote, a written scope of work, disposal manifests, and a full documentation package so you have everything you need for compliance and future disclosure. Hmjcontracting also handles permit management and can coordinate post-abatement renovations so your project moves forward without gaps. With a 5.0-star Google rating and over 25 years of local experience, the team is ready to review your report findings and give you a clear, honest plan. Contact Hmjcontracting today for a free estimate.
Sources
These authoritative sources cover the rules and guidance that apply to Canadian homeowners and property managers dealing with abatement reports:
- Asbestos: Frequently asked questions for homeowners
- Guide: Regulation respecting asbestos in construction projects and buildings and repair
- Asbestos safe work procedure guide (Worksafe Saskatchewan)
- Asbestos: Frequently asked questions for homeowners (WorkSafeBC)
- 10 steps to complying with asbestos abatement requirements (WorkSafeBC)
- Asbestos Inspection Report: What It Contains and Means - InspectandTest
Documents to ask your contractor to reference in all project paperwork: the original lab certificate and chain-of-custody, the DSS or inspection report number, and the provincial notification number issued before abatement began. These references create a traceable record that connects every phase of the project.
This article is general information, not a substitute for advice from a qualified doctor. Consult a qualified healthcare professional about your own circumstances before acting on anything here.